How to Create Your Own Shopify Store in Less than 15 Minutes
INTRODUCTION
Do you want to learn how to develop your own Shopify store? Perhaps you have a great product idea that you want to market to people. You’re lucky because Shopify Stores can be built in within the timeframe of 15 minutes.
Shopify store is everything you need to sell anywhere. Start your 14-day free trial today. Click Here To Get Started
What is Shopify and How Does it Work?
Shopify store is a well-known brand in the ecommerce industry. However, not everyone understands what Shopify is or how it works. Simply say, shopify is basically a software program that you pay for via the SaaS model, means you subscribe to the service. Most times, you get a slightly lower cost if you buy a year of support in one payment.
Shopify store allows merchants and ecommerce business owners to create websites and sell digital and physical products to customers globally. Shopify store also offers customers the ability to effectively manage shipping requirements and track inventory. Shopify gives you access to a top-notch admin panel. This allows you to see all the products that you have, create descriptions, and process orders.
Shopify Pricing – How Much Does Shopify Cost?
Here is a breakdown of pricing for each plan:
- Starter Plan – $5 per month
- Basic Shopify Plan – $29 per month + 2.9% and 30C/ per transaction
- Shopify Plan- $79 per month + 2.6% and 30C/ per transaction
- Advanced Shopify Plan – $299 per month + 2.4% and 30C/ per transaction
- Shopify Plus Plan – pricing plans start around $2000 per month + 2.15% per transaction
How to Create Your Own Shopify Store With in 15 Minutes
Shopify store is an excellent ecommerce platform. It’s no secret that Shopify store tops our list. It used to take a lot of time and a lot of knowledge to set up an ecommerce shop. Nowadays, setting up an online shop is easy and takes only a few minutes. You can easily set up an online store with just a few clicks and some typing.
There is an explanation as to why shopify is a very popular platform. The best reason is that it’s so easy to create your first online shop without stress. We show you how to set up Shopify store in just 15 minutes in the video below. To learn more about shopify, you can either sign up for a 14-day free trial or read the complete Shopify review here. If you already developed a Shopify site that needs some working on or trying to start a Shopify site from scratch, Storetasker is a service that can help you find the right person to work on your Shopify site.
You can watch the video below to understand how to set up your eCommerce platform with Shopify Store
If you’re more into reading, here’s a detailed tutorial for you to walk through:
Start your 14-day free trial today. Click Here To Get Started
Step-by-Step Guide on How to Use Shopify
Step 1: Sign Up for Shopify
This first step is the easiest stage in setting up Shopify store. To get started with Shopify, you only need to sign up for an account.
Navigate to Shopify’s website and click the Get Started button. Enter your email address, password, and store name.
You will need to select a unique name to your store, Otherwise Shopify won’t let you purchase the domain.
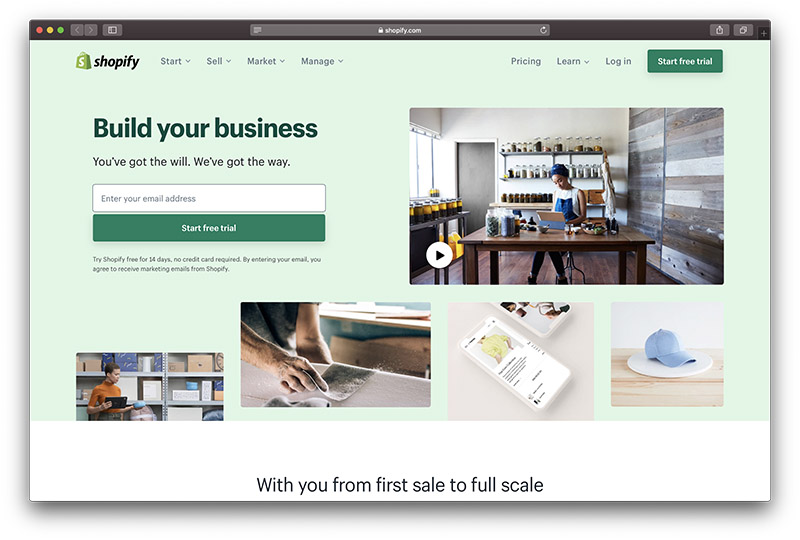
Click Next to tell Shopify more about you. Especially how much sales you plan to make and if you’re already selling. When you’re done, click on the Enter My Store button.
The next step is to choose whether you want to open a brick and mortar store or an online shop. We’re going to create an online shop for this tutorial. Click Next.
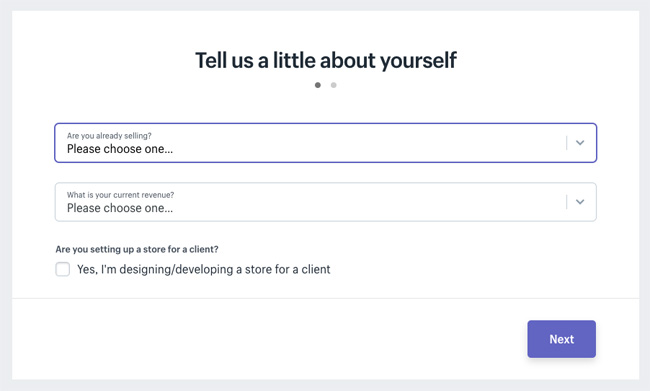
On the next page, you will be asked to enter personal information, such as your name and address. This information is necessary to set up currencies and tax rates.
Step 2: Add a Product to Your Shopify Store
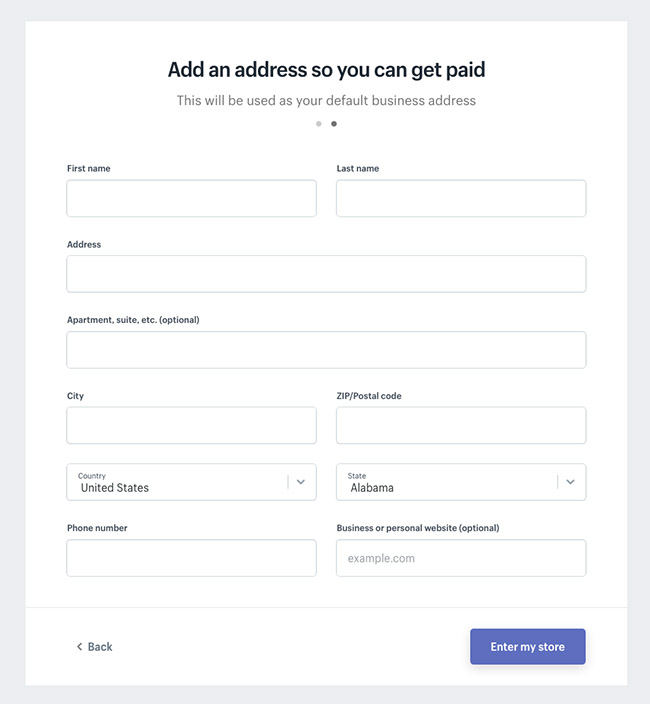
After you have signed up for Shopify, you will be taken to your admin screen for your new website by the software. This is where you can begin to customize your store and upload products for customers to view.
When visiting to your Shopify store backend It will guide you through the steps of setting up your shop. You will be asked to add a product by the first button. Click that button first.
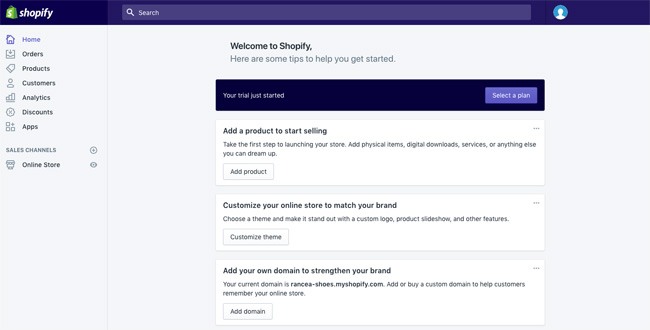
The Add product page looks similar to what you’d see on WordPress. You can add details such as a title, description and price. You can complete as much or as little of the product page as you like. Make sure to save the product at end.
Do not forget, images that are related to your product can either make or break sales. It is important to select images that appeal to your target market. Do not overlook the importance of the visuals on your website.
Also remember, you can also set up groups or collections of products to suit your needs. If you owned a clothing website, for example, you could set up a page for men’s clothes or shoes and accessories.
Start your 14-day free trial today. Click Here To Get Started
Shopify store allows you to arrange for identical products to appear in multiple collections. This makes it much easier for customers to find what they are looking for. You can choose how products are added to a collection when you add it to your shop. You can, for example, have products that meet certain criteria added automatically to your store.
Step 3: Customize the Look of Your Shopify Website
Return to the main dashboard and click the Customize the look of Your Site button. You can customize everything from colors to logos in this area. It takes some tinkering but the most important part is the link asking you to visit the Theme Store.
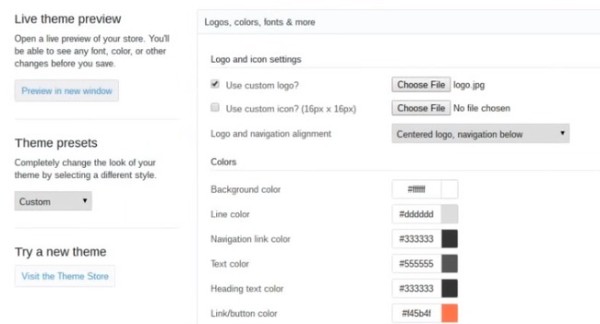
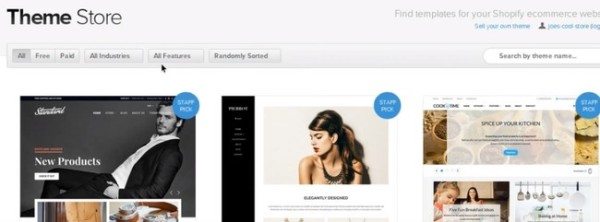
Shopify offers hundreds of themes to help you create a website that is unique.
Premium themes are more appealing than free themes. Premium themes can be customized with additional features. If you are interested in getting down to the smallest details of your website’s appearance, it may be worth paying a bit more for a professional theme. Accessing the CSS and HTML elements of the theme will allow you to make many changes to the site’s appearance and performance. You can always visit the Shopify Experts page if you don’t have any coding expert around.
Shopify has many experts who specialize in Shopify themes, product descriptions, email marketing, and much more. Shopify Experts is a community that can help you with almost any challenge.
Here are some things that you can do to improve your Shopify theme
- Fonts
- Color schemes
- Items that appear on the page
- Related item functionality
- Homepage carousel slides
- Logos
Step 4: Setup Your Domain with Shopify
Once you have chosen your template and designed your website to your satisfaction, it is time to choose a domain and go live with your site.
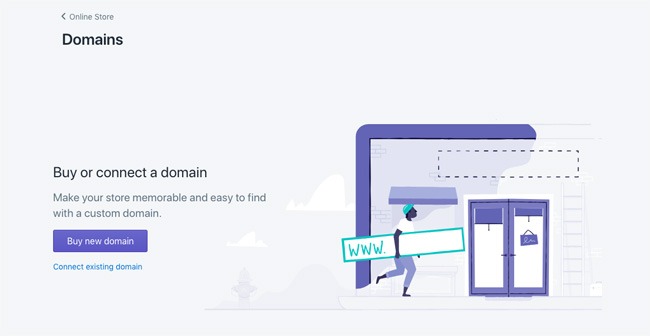
Click on the button that says Add a Domain on the dashboard. You will be asked if you wish to transfer or register a domain. Select the domain that you want and follow the steps to complete the purchase. Also, you will need to indicate which Shopify payment option you prefer.
You have two options: you can purchase a domain through Shopify store and have it added to your store or you can buy a domain name from another source and add it to Shopify store. If you upload an existing name, you will need to change your DNS records.
After activation, you will be able to go to the domain and view your website.
When you are in the main area on your Shopify website make sure to complete the following information:
Start your 14-day free trial today. Click Here To Get Started
- General: Fill in all information, including billing information and legal details, in the Settings area.
- Taxes: To help you with your accounting, ensure that the box next to “charge tax” is clicked in the Variants section.
- Shipping: To see which products require additional shipping costs, click on the “requires shipment” button next to them. This will let you know what products are subject to an extra charge for packaging and postage. You can choose either a weight-based shipping option or something that allows you to sell as many of your products as possible.
Shopify store allows you to test your order system before selling online. To do this, go to the Admin section and click on Settings. You can then choose a credit card gateway that you want to test from the Payments section. To test, click on “Bogus Gateway”, and then you can place an order as if it were your normal customer.
Step 5: Activate your payment processor
Click the tab called Payments to the left of your dashboard. You can choose from many payment processors like Stripe or Authorize.net. Shopify store has its own payment processor that is very easy to use. Follow these steps to activate your payment processing. This will allow you to accept payments, and then deposit those payments into an account.
When you are building your ultimate Shopify store, payment gateways will be one of the most important aspects you need to think about. The right gateway for you will depend upon many factors, such as:
- Transaction fees: Many payment gateways charge a small transaction fee for each person who purchases from your site. You should choose the lowest price gateway.
- Card types: You need to choose a payment gateway that can accept a variety of payment options and card types, such as Stripe and PayPal.
- Offsite checkout: Payment gateways can take payment from your website to their server by using a form. Although this payment gateway strategy is slightly more secure, it can also be a hassle for customers.
Once all of that is done, you can click the Launch Website button and make your store live.
Congratulations! You now have a fully functional Shopify online store.
How do Shopify Payments work?
After your Shopify store has been set up and is operational, you will need to plan how you will start accepting payments from Shopify customers.
Shopify’s “Shopify Payments” option is one of the easiest ways to manage and access your online payments. (Read our Shopify Payments review). You don’t need to open a merchant account through another provider such as Square or Stripe. Shopify Payments is fully integrated with your online shop, so you can easily view all your payouts from a Shopify admin.
You will need to create a “Pay Period” if you choose to use Shopify Payments to accept customer cash. This is basically the time period between the time your customer places an order on your site and the time the funds are transferred to your bank account. Orders placed Friday or Saturday are typically combined and sent as one payment.
Start your 14-day free trial today. Click Here To Get Started
Importantly, just because you can set automatic payout dates in your Shopify store account doesn’t mean you have to wait forever for your money. Shopify’s payments gateway will automatically give you the money earned for a particular day once the funds have been processed and are therefore available. You can also choose to be paid at a different rate or weekly if that’s what you prefer. The payout will be scheduled on the specific date you have chosen as a recurring date. To schedule your payouts:
- Go to Settings and Payment Providers
- Click on “Manage” in Shopify Payments
- Click on “Payout Details” in the Payout Schedule
- Click Save
Shopify Payments offers a number of useful features such as fee tracking and payout balances. You can view how much you are receiving from each order by accessing the admin section of Shopify. Shopify Payments also has a single fee: the card rate you must provide to the card company to complete the transaction. There is no subscription fee.
Many third-party payment processors have a subscription fee, which you will need to pay in addition to the usual credit card fees.
How Does Shopify Shipping Work?
In the sections below, we briefly discussed Shopify’s shipping options. If you plan on selling physical products through your online store, you will need to have a plan of how you’ll ship the items to your customers.
Shopify’s store builder comes with an integrated suite that automatically calculates the best rates for customers and you using reliable sources such as DHL and UPS. Shopify store Shipping allows you to quickly process online orders and create shipping labels without having to deal with any additional plugins. This feature is what makes Shopify stand apart from other ecommerce website builders.
Shopify store, unlike other online software solutions such as WooCommerce has established agreements with major shipping companies around the globe to reduce costs and help customers serve their customers as efficiently as possible. Shopify’s shipping options are available in all platforms. To find them, go to your Settings page and click the Shipping option.

You will need to fill in all details so that Shopify Shipping can be used effectively for your business. You will need to list dimensions, weights and available variations for your products. Once your carriers are connected to Shopify, it’s possible to begin fulfilling orders for customers.
There will usually be multiple shipping options listed under your product information. You can either let your customers choose the speed they prefer or upgrade them to a faster or cheaper service. Shopify allows you to select from many shipping options, but your customers will only see the shipping rates you have already calculated.
How Does Shopify Dropshipping Work?
Shopify is a flexible online store-building platform, that’s why many people love it. There is no one-size-fits all strategy to selling. Shopify allows you to sell products in many ways.
Dropshipping is an alternative to the traditional store and ship strategy. Dropshipping is rapidly becoming a popular method of order fulfillment. You don’t need to locate storage or manage products before you can deliver them to customers. Dropshipping is also risk-free. You won’t have to spend all your money on stock only to realize that you don’t have the ability to shift it when you need it.
Dropshipping allows merchants the option to select a supplier or another person in the eCommerce industry to fulfil the sales part. Simply list the item on your website and then when someone orders it, send the details to the dropshipping company. The company will then ship the item to the customer.
Dropshipping is only one of the tools that are available to ecommerce store builders. Shopify is one of these tools. Shopify allows you to accept dropshipping credit cards orders as part your Shopify plan.
Shopify dropshipping allows you to link physical and digital products from dropshippers to the website using services such as Oberlo. Oberlo, a dropshipping app for Shopify only, is dedicated to this purpose.
Start your 14-day free trial today. Click Here To Get Started
How Does Print on Demand Work with Shopify?
Dropshipping may not be the best option for you if you are still learning Shopify. Print on Demand is one of the most advanced Shopify features that users have access to today.
Print on Demand is a similar concept to dropshipping. You work with third-party suppliers. Print on Demand allows you to create a pricing plan and have a supplier customize white label products like bags or hats. This is a great way to give your online business a unique edge in their sales strategy. Find out more about Print on Demand, an online business strategy.
Dropshipping with Shopify is possible through Shopify add-ons. Shopify offers a variety of tools that can be used to customize your ecommerce website. These add-ons can be used in a number of ways that are easy and intuitive. Some of these add-ons include:
- Printful: One of the most popular Shopify apps, Printful allows you to print on demand. You can explore a variety of brands and products, as well easy-to-use generators to create mockups. Printful offers a user-friendly interface and access to direct to garment printing that is great for cut and sew printing and direct material printing. Printful allows you to customize the unboxing experience beyond product descriptions. You can also add stickers, package inserts, and other unique payment methods.
- Lulu Xpress: This is another popular print on demand option for Shopify account holders. Lulu Xpress gives business owners all the tools they need to print, distribute and print eBooks. Lulu Xpress, unlike other Shopify apps that allow you to print on demand, focuses on books. This add-on has downloadable templates that can be used to start your project and a transparent pricing calculator. The system is not available with an editor, nor a free trial for a multi-day period.
- Printify: Printify, another well-known option for Shopify users who want to create their own online store. Printify is a great way to use Shopify to improve your online store. It allows you to access white-label products you won’t normally find elsewhere. You can also find custom jewelry, shoes and clocks. Printify’s lite plan is completely free. However, a premium subscription is available for $29/month and will allow you to save 20% on all your products. This is a great option for Shopify store owners who want to save money.
What is Shopify Starter?
The Shopify store Starter account may be the right choice for you if you have been looking through Shopify account options recently and are unsure which one is best for you. Shopify Starter plans are for those who have an existing website and want to make it more modern with Shopify.
Shopify Starter is a great way to sell products online if you want to sell products without maintaining an entire ecommerce store for your company . The Shopify Starter plan lets users sell items on social media and add shopping carts for existing blogs. The best part is that the plan is very affordable and includes access to all the Shopify point-of-sale systems. Shopify Starter doesn’t allow you to create your own website, or even play with SEO (Search engine optimization). You can access the application to view a point-of-sale when you sell at tradeshows and pop up stores.
Shopify Starter is ideal for social media selling, basic Shopify shopping cart features and comes at a lower price than many of the other Shopify options. You can embed shopping cart functionality on any website you have, no matter if it is Wix, Magneto or Squarespace. It costs only $5 per month.
Remember that Shopify Starter can be used to sell offline, but you cannot create an online store using the software.
Do you want to learn how to set up Shopify? Perhaps you have a great product idea that you want to sell. You’re lucky because Shopify Stores can be built in just 15 minutes.
Selling on Facebook with Shopify Starter
Shopify Starter plans are attractive to many companies as it allows them to move the selling beyond the ecommerce site to social media. Shopify Starter has a fully integrated Facebook store option that will help you reach your target audience and sell more products.
You can sell your products on Facebook seamlessly with the Sell on Facebook option. Shopify Starter can also be integrated with your existing Facebook Business account. The Shop tab is created for your social media campaigns and includes product galleries as well as a secure shopping cart. Mobile optimized, the Shop tab can also be used for buying on-the-go.
Shopify Starter and Facebook Business merge to simplify product management. All product information, as well as any modifications, can be uploaded into the Facebook space. There will be no need to update pricing, availability, product descriptions or product images on either channel.
Shopify Starter offers collection ordering, which is only available in Shopify. This feature can be saved in Shopify. Everything will change on your Facebook account. Shopify will remove your product from your store automatically if it is out of stock or no longer available. This ensures that you don’t disappoint customers.
Connect with customers and sell via Facebook messenger
If you decide to pick the slightly less expensive version of Shopify store Starter, then you’ll get the live chat module for Facebook messenger included. This feature is an amazing addition that allows businesses to communicate with customers at any time they need it.
Shopify integrates with Facebook to provide a quick and easy checkout module. This simplifies the process for customers to purchase products from your company. This is important when you consider that 73% customers believe customer experience is key to their buying decisions.
Facebook messenger is much more than a simple chat box. It allows customers to browse your products, and make purchases through the messenger app. Customers can get instant answers to most of their questions via the messenger app, which has automated responses.

Every response you can send automatically from Facebook Messenger includes a call to action at the end. This allows shoppers to continue their shopping journey by reading product descriptions or making purchases. With automated messages including tracking codes and shipping information, Facebook messenger ensures that your customer stays in touch after a purchase.
Setting up a Facebook Shop with Shopify
Shopify and Facebook allow you to display Shopify products directly from your Facebook page using the Facebook shop option. This is essential if you plan to add Shopify’s Facebook Messenger feature to your online sales strategy.
Your Shopify products will be displayed on Facebook’s shop section automatically when you create your Facebook Shop Solution. Shopify will allow you to edit products, review sales strategies and view orders. Before you can get started, ensure that your store meets all the requirements for merchants listed on Facebook. A Facebook page is required for your business. You will also need to be familiar with the policies and procedures for selling on Facebook.
Start your 14-day free trial today. Click Here To Get Started
When you are ready, add your Facebook shop to your Shopify admin portal. Facebook will then review it. After your shop has been approved, you can add products and collections to your Facebook page. They will then be available in your Facebook shop. Your customers will be able to purchase products directly from Facebook without needing to go to another page.
Here are the steps to add a Facebook store to your Shopify account.
- Click on the + button in the Sales channels section of your Shopify admin page.
- Click on the “add Sales channel” option then click on the Facebook option
- Choose “Add Channel” to connect the Facebook account that you want to link to your business.
- Click on the “Facebook Shop” option and go into the Account settings to connect your account.
- If you are already logged in to Facebook, you may be asked to confirm that you wish to connect this account.
- Follow these steps to log into Facebook and allow Shopify to link your Facebook business page.
- There you go! You’re ready to start selling directly with Facebook through Shopify.Wait for Facebook to review your store. This can take up two days. Once approved, you will receive an email notification.
Here you are! Now you can start selling directly through Facebook using Shopify.
How does Shopify store do with Amazon?
Shopify’s ease of integration with leading sales tools is one of its strengths. Shopify seamlessly integrates with Facebook. moreso, Shopify can combine with Amazon as well. Shopify’s integration to Amazon makes it easy for you to list your products on one of the largest marketplace environments in the world, so you can reach next-level success as a growing brand.
Your online store will allow you to have more control over how your business interacts with customers. Selling on Amazon can help you reach new customers and increase sales.
You will need to go to Amazon Services and register for a professional seller account through the Amazon merchant program. Although Amazon integrations are free from Shopify, you will need to pay to get your Amazon seller account. A $39.99 monthly fee will be required to become a professional seller. A small referral fee is also required. However, the cost will vary depending on the product category and niche.
Once you have your seller account, it is possible to check to see if you have any products that fit into the Amazon “approved category” section. You will need approval to sell your products. Make sure you apply as soon as you can. You’ll be able sell your products faster if you submit your application early.
Once your professional seller account is approved, you can add your Amazon Sales channel into your Shopify store. Go to your Shopify admin page, and click the “+” button beside your sales channels option. Click on “Amazon by Shopify”, and then select “Add channel”.
Creating Amazon Listings for your Product
Before you can start selling on Amazon with Shopify, there are some things you need to do. You will need to buy a unique identifier for your products, called a UPC. This is basically an item’s unique identifier. You’ll get nothing but error messages if you don’t provide Amazon with a UPC and ISBN for your products.
Dropshipping is a way to resell products from others. You might have access to UPCs you can use. If you have made the product, you will need to buy a UPC. Amazon will waive this requirement if you are an Amazon registered brand.
Once you have your UPC, you can start creating product listings to convince your audience to purchase what you sell. Shopify allows you to create and implement product listings. You can simply go to the Amazon sales channel and enter the required details. You might need to add specific information if your product was made by another brand.
If you’re not sure what to write, you can always check out Amazon’s search function to see if something similar has already been posted on Amazon.
You can also claim any Amazon listings you have in your Shopify Store. You can claim any existing product listings in your Shopify Store if you are selling any category of Amazon products. This will allow you to increase your product’s visibility. You can also create listings with Amazon to sell products in unsupported categories on Amazon.
All listings associated with your Amazon professional seller account should be visible on the Amazon Listings page in Shopify. Start by clicking “Link Products” and ensure that all your sales strategies are connected.
Amazon and Shopify seamlessly integrate, so your listings and products will sync with Shopify via their Orders page. Orders placed on Amazon will be marked as such in the Shopify Admin portal. This allows you to see how your products are selling across different platforms. You must fulfill all orders received from Shopify accounts. Your order will remain unresolved if you do not.
How Does Shopify Work with eBay?
Amazon isn’t the only online selling and marketing environment that you might want to sell with when you get started on Shopify. You can also explore the Shopify integration with eBay if you are looking to further expand your sales strategy. eBay has around 170 million customers around the globe.
The eBay integration will sync with your Shopify store in the same way as Shopify’s integrations to Amazon and Facebook. To get started, you only need to make a few changes in your admin account.
To create a new eBay listing, add all your products to your Shopify account. Next, sync your product information to the eBay sales channel. This will save you time and reduce the amount of work required to enter the exact same product information twice. Shopify saves you time and allows you to sync all your inventory with Shopify. To sell products through Shopify, you’ll need an eBay sellers account.
Shopify provides snapshot reports that show you which accounts perform best from Amazon to eBay, and other sources. You can integrate Shopify and eBay to:
- Manage all of your eBay orders and inventory through the familiar Shopify interface
- Fulfil your orders from eBay directly within your Shopify admin account
- Reconcile your revenue from eBay sales using your Shopify reports
- Set specific prices for eBay listings that are separate to other prices
- Manage your business policies on eBay within Shopify
- Communicate with your customers using eBay messaging features.
To select eBay as a selling option, just like the other Shopify integration options, click the plus (+) sign under the Sales channels option in Shopify admin. To learn more about eBay integration, you can visit the Shopify App Store.
Selling Offline with Shopify
Shopify offers many ways to sell and shop online. But what if you’d like to meet customers face-to-face? You can still use the Shopify platform’s excellent functionality. With the Shopify POS feature, you can.
Shopify Starter is ideal for selling at retail locations such as pop-up shops, exhibitions, and markets. It comes with a standard point of sale feature that allows you to take credit card payments in person using Stripe, Square, or PayPal. Shopify Starter also includes a plug-and play card reader, which you can use to accept online and offline payments.
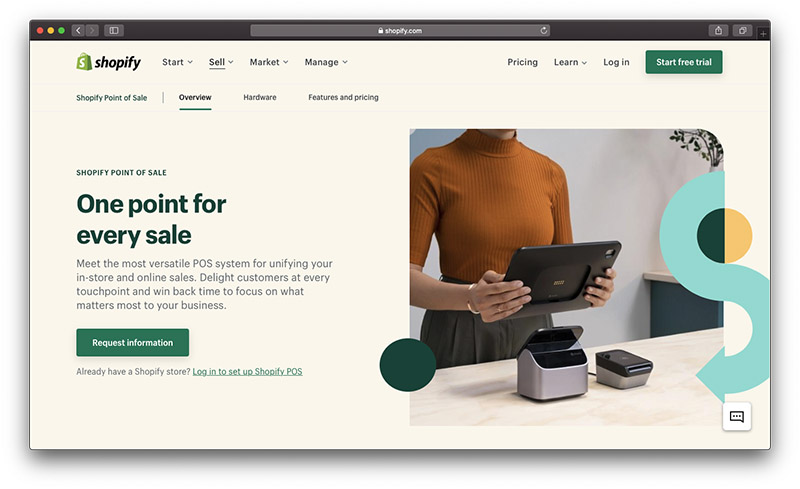
Companies can accept credit cards payments, adjust tax requirements and offer discounts with the POS feature. You can offer to ship products, process refunds and accept gift cards as partial payment. Shopify comes with its own dedicated POS staff as part of the deal. Automatic inventory sync across all channels is included with Shopify!
Shopify Website Builder: What are the Differences Between Shopify and WooCommerce?
If you’re looking for an ecommerce selling solution for the first time, then you’ll probably have noticed that there are a lot more options available aside from Shopify. The most widely used tool is one that integrates directly with WordPress, the world’s best CRM tool. WooCommerce, a digital selling platform similar to Shopify but only compatible with WordPress, is WooCommerce.
WooCommerce is a different service. While Shopify provides an all-in-one system that allows you to manage your ecommerce, web design, and product management features for a monthly fee, WooCommerce operates in a different manner. WooCommerce is a plugin that must be installed on a WordPress site.
Let’s look at Shopify’s advantages over other ecommerce website-building tools. We will also examine when Shopify is used and when WooCommerce might be used to build your store.
When Would You Want to Use Shopify to Create an Online Store?
Shopify is an excellent tool for people who are just starting out in web development and those who don’t want too much work. You can also use it to avoid hiring a developer. It doesn’t matter how many products you sell, most companies have no problem scaling up.
Create Your own Online Store: When Would You Want to Use WooCommerce?
WooCommerce is a great tool for anyone who wants to customize their site. WordPress is open-source, so you can use a variety of plugins and code improvements to customize your site. You don’t need to have any programming knowledge. WooCommerce is worth considering if you are looking for more control and a challenge to your site’s appearance and performance.
What About Creating an Online Store with WordPress?
Shopify clearly has many benefits for online sellers and merchants. Shopify may not be the right choice for you. You might be better off exploring other top-selling options available on the internet. As we have already mentioned, Shopify is not the only competitor to WordPress with its WooCommerce sales solution.
Here’s what you can do if you want to create an online store with WordPress instead of Shopify.
Step 1: Choose a Domain and Hosting Account
To implement a WooCommerce shop, you need to select a hosting account that will host your files. Bluehost is a trusted, secure, and simple-to-use platform. They also offer an easy way to install WordPress.
Moreso, bluehost also offers a monthly service that integrates WordPress and WooCommerce so you don’t have to do anything.
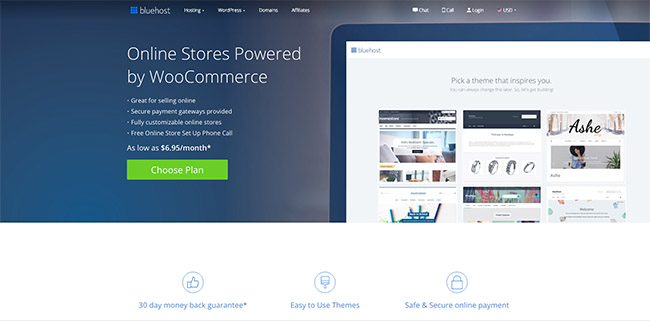
Visit the bluehost’s page which explains how to integrate. To get started, click on the Get Started Now link. The WooCommerce package includes hosting, SSL ecommerce security and at least 100GB website space. Crucially, WooCommerce has been installed and optimized.
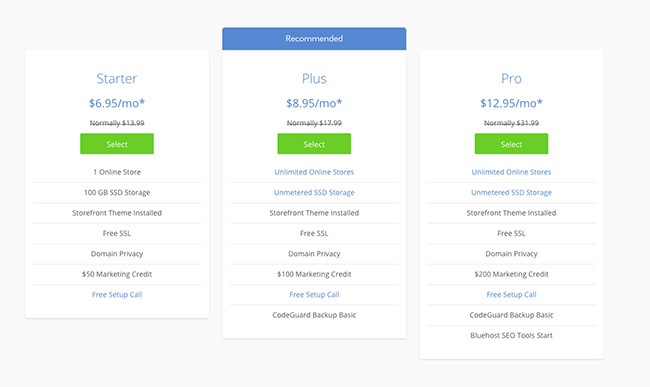
Choose a plan, then move onward.
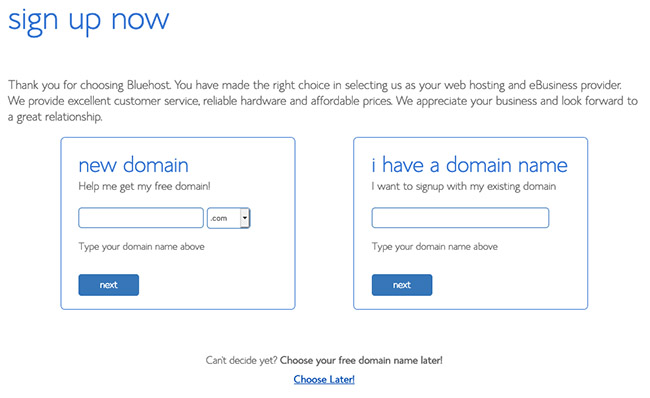
Next, you will be asked to select a domain name or transfer an existing one. It will let you know if the domain is available after you have entered it. Next, you will need to enter your personal information and package details. I recommend that you choose the plan that interests you most and skip any extras.

Continue to walk through the setup process, where it will ask you for your Bluehost login credentials. The Bluehost CPanel will bring you to the WordPress button located under the Website Builders header. You can then follow a few simple steps to complete the WordPress installation.
At the very end, it will tell you the domain you can go to for logging into your WordPress backend.
Step 2: Purchase the Divi Theme
This is the easy part. Follow the steps to purchase Divi WordPress theme.
Step 3: Install the Divi Theme
WooCommerce/Bluehost is already installed on your site if you have chosen the WooCommerce/Bluehost option. Install WooCommerce on your website if you don’t have it.
It’s now time to choose a theme optimized for WooCommerce. There are many options, but we recommend Divi as it is easy to brand and customize for your purposes.
Download and purchase the Divi theme. Upload the file to your WordPress backend and activate it as your primary motif. You can do this by clicking on Appearance > Themes and then Add New.
Step 4: Add a Product to WooCommerce
Navigate to Products > Create Product.
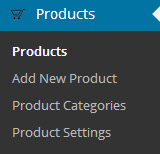
This creates a new page that is similar to the blog post you’d normally create on a WordPress website. Add a title and description to your product. Scroll down to see more details, including shipping and pricing, as well as links products.
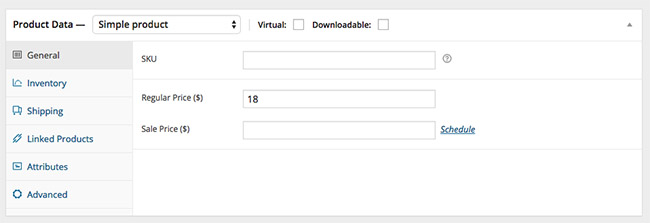
Bear in mind that there are many things you need to do for your WooCommerce website. However, most technical details can be found in the WooCommerce documentation. This should suffice to get your website up and running for now.
We wish you all the best on your ecommerce journey, regardless of whether you choose Shopify and WooCommerce.
CONTENT SUMMARY
Everything You Need to Know About Shopify: The Ultimate Guide for Online Entrepreneurs
In the fast-paced world of e-commerce, having a reliable and user-friendly platform is essential to the success of any online business. Enter Shopify—one of the leading e-commerce platforms that empowers entrepreneurs, small business owners, and large brands to create, customize, and manage their online stores with ease.
Whether you’re starting a new business or scaling an existing one, Shopify offers the tools and flexibility you need to run a successful online store. In this blog post, we’ll explore what Shopify is, why it’s so popular, and how it can benefit your business.
Start your 14-day free trial today. Click Here To Get Started
What is Shopify?
Shopify store is a cloud-based, all-in-one e-commerce platform that allows businesses to set up an online store and sell products or services to customers around the world. It offers a variety of customizable templates, powerful integrations, and easy-to-use tools that make building and managing a store simple for beginners and seasoned business owners alike.
Founded in 2006, Shopify has grown to support over 1.75 million businesses in more than 175 countries, becoming one of the most popular e-commerce platforms globally.
Why Choose Shopify?
Shopify stands out because of its ease of use, scalability, and versatility. Below are some of the top reasons why millions of businesses choose Shopify to power their online stores:
-
Ease of Use Shopify is designed with simplicity in mind. You don’t need to be a tech expert to get your store up and running. Its user-friendly interface makes it easy to set up a website, add products, customize your storefront, and manage orders. The drag-and-drop editor lets you create a professional-looking store without any coding knowledge.
-
Customizable Store Design Shopify store offers a variety of free and premium themes that you can customize to fit your brand. Whether you want a sleek, minimalist design or a bold, vibrant store, you can tailor your website to reflect your unique style. Plus, Shopify’s themes are mobile-friendly, ensuring that your customers have a seamless experience, whether they’re shopping on a phone, tablet, or desktop.
-
Extensive App Ecosystem The Shopify App Store is home to thousands of apps and integrations that can extend the functionality of your store. From marketing tools to customer service apps, analytics, and inventory management systems, there’s an app for almost everything. This means you can easily add new features and tools to help grow your business.
-
Secure and Reliable Security is a top priority for Shopify. With SSL certificates, PCI compliance, and reliable hosting, you can trust that your online store is secure and your customers’ data is protected. Shopify also offers 24/7 customer support, so you can get assistance whenever you need it.
-
Scalability Whether you’re just starting out or you have an established business, Shopify grows with you. The platform can handle businesses of any size, from small stores with a handful of products to large enterprises with thousands of SKUs. As your business scales, you can upgrade your Shopify plan to access more advanced features.
-
Multiple Sales Channels Shopify allows you to sell across multiple sales channels, such as Facebook, Instagram, Amazon, and eBay, all from one platform. This means you can reach a wider audience and streamline your sales process by managing everything in one place.
-
Payment Flexibility Shopify supports over 100 payment gateways worldwide, including Shopify Payments, PayPal, Stripe, and more. Shopify Payments, the platform’s built-in payment solution, eliminates transaction fees and ensures a smooth checkout process for customers.
How to Get Started with Shopify
Getting started with Shopify store is easy, even if you’re new to e-commerce. Here are the basic steps:
-
Sign Up for a Shopify Account Head over to shopify.com and sign up for an account. Shopify offers a free 14-day trial, so you can test out the platform before committing to a plan.
-
Choose a Theme Browse through Shopify’s collection of free and premium themes to find a design that suits your brand. You can preview how your site will look and customize it to match your vision.
-
Add Products Once you’ve chosen a theme, you can start adding your products. Shopify makes it easy to upload product photos, write descriptions, set prices, and manage inventory.
-
Set Up Payments and Shipping Connect your preferred payment gateway to accept payments from customers. Then, configure your shipping settings, including rates, carriers, and delivery zones.
-
Launch Your Store After customizing your store and adding your products, you’re ready to launch! You can purchase a domain name through Shopify or connect an existing one.
Shopify store Plans and Pricing
Shopify offers several pricing plans to cater to businesses of all sizes:
- Basic Shopify ($29/month): Ideal for new or smaller businesses, this plan includes everything you need to launch your store, including unlimited product listings, sales channels, and basic reporting tools.
- Shopify ($79/month): This plan is perfect for growing businesses, offering additional features like professional reports, gift cards, and more advanced shipping options.
- Advanced Shopify ($299/month): For larger businesses, this plan includes advanced reporting, third-party calculated shipping rates, and more staff accounts.
- Shopify Plus (custom pricing): Shopify Plus is designed for high-volume merchants and enterprises, providing a fully customizable solution with enterprise-grade features.
Who Should Use Shopify store?
Shopify store is an excellent choice for:
- Small Businesses and Startups: If you’re launching a new online store, Shopify offers everything you need to start selling, without overwhelming you with complex tools.
- Established Businesses: As your business grows, Shopify’s scalability and powerful integrations make it easy to expand and add new sales channels.
- Entrepreneurs and Creators: For those looking to sell custom products, digital goods, or services, Shopify’s flexibility and customization options allow you to build a store that matches your brand.
Conclusion
Whether you’re a seasoned business owner or just starting your e-commerce journey, Shopify provides a powerful and easy-to-use platform to help you succeed. With its customizable designs, robust app ecosystem, and scalability, Shopify empowers you to create a professional online store that can grow with your business.
With Shopify store, the possibilities are endless—so if you’re ready to take your business online, it’s time to give Shopify a try!
